Prologue
Most of my posts are written for my own personal satisfaction, and to share my experience with friends and family. This post is a little different.
I would imagine that most of my friends and family will be bored to tears with this post. And so, if I wrote it, I must have had something else in mind, right?
In this case, I knew that many people were bewildered with how to use Open Source maps (openstreetmaps), and I had successfully used them when I toured across Patagonia. And so, this was/is my attempt at giving something back to the community from whom I’ve gotten so much.
If you’re planning a trip, and need to understand how to use OpenStreetMaps as your map source, then this post is for you.
Introduction
These days when you purchase a GPS device, you either receive it with lifetime map updates, or you don’t. To a large degree, Garmin now offers lifetime map updates on many, or even most of their GPS devices, but they limit the maps to be only the map that was purchased with the GPS, when it was bought new. So, if you purchased a Garmin GPS in America, you’ll receive lifetime updates to the North American map, but you won’t have free access to maps of Europe, Asia, etc.
Let’s say that you’re going to travel around the world, and that you’ll need another 20 or 30 maps, in order that you’ll have detailed information about each country or region you’ll be visiting. You’ll have 3 choices.
- Purchase maps from Garmin, for about $60 for each country’s map
- Purchase maps from a 3rd party, specially designed to work in a Garmin GPS
- Download free maps from the Open Streetmaps foundation
The pros and cons – Let’s see what’s best
If you selected the first option, and you wanted to visit 30 countries, you might need to spend as much as $1800 for all of the maps. Each map will have a key and an activation process, and each map can be installed on a single device (usually that’s the case). Facts in favor of this option is that these maps are often very detailed, and they come with whatever support you might need, as you install them.
If you selected the second option, you might pay less, but you’ll usually get high-quality maps, which come with installation support.
However, if you select option 3, you won’t pay a dime, but brother you’re on your own. On the positive side, you’ll receive all of the maps at no cost, and you’ll be able to create virtually any map that you want, combining whichever tracks of land you’ll be riding on, so your map will be optimal.
These Open Source maps are generally not as current or accurate as the maps provided by the two other options, but in some cases, because the maps allow people to contribute to them, their accuracy is always improving, making them more and more accurate with each passing day.
In my case, as you might have expected, I chose option 3, so this post is all about some of the technical obstacles that you’ll have to overcome if you want to use free maps. Let’s restate the problem, and then go through the process of solving for all of the obstacles that will come up.
Building multiple maps for a Garmin GPS (Problem & Solution)
Problem Statement: I want to be able to visit multiple countries on my motorcycle, using the BMW Navigator VI as the GPS across all of the different countries that I’ll be visiting. Some of these countries are vast in size, while others are small, and some are dense with roads and Points of Interest, while others are sparse with Points of Interest. This results in needing to have a single, huge, detailed map, or installing multiple maps, tuned and built to travel to only those portions of the world that I’ll be visiting on my trip. Given the tools that Garmin provides to its customers, and the open source tools available, it is almost impossible to install the maps in Basecamp, and on the BMW Navigator VI.
Obtaining Open Streetmap Maps
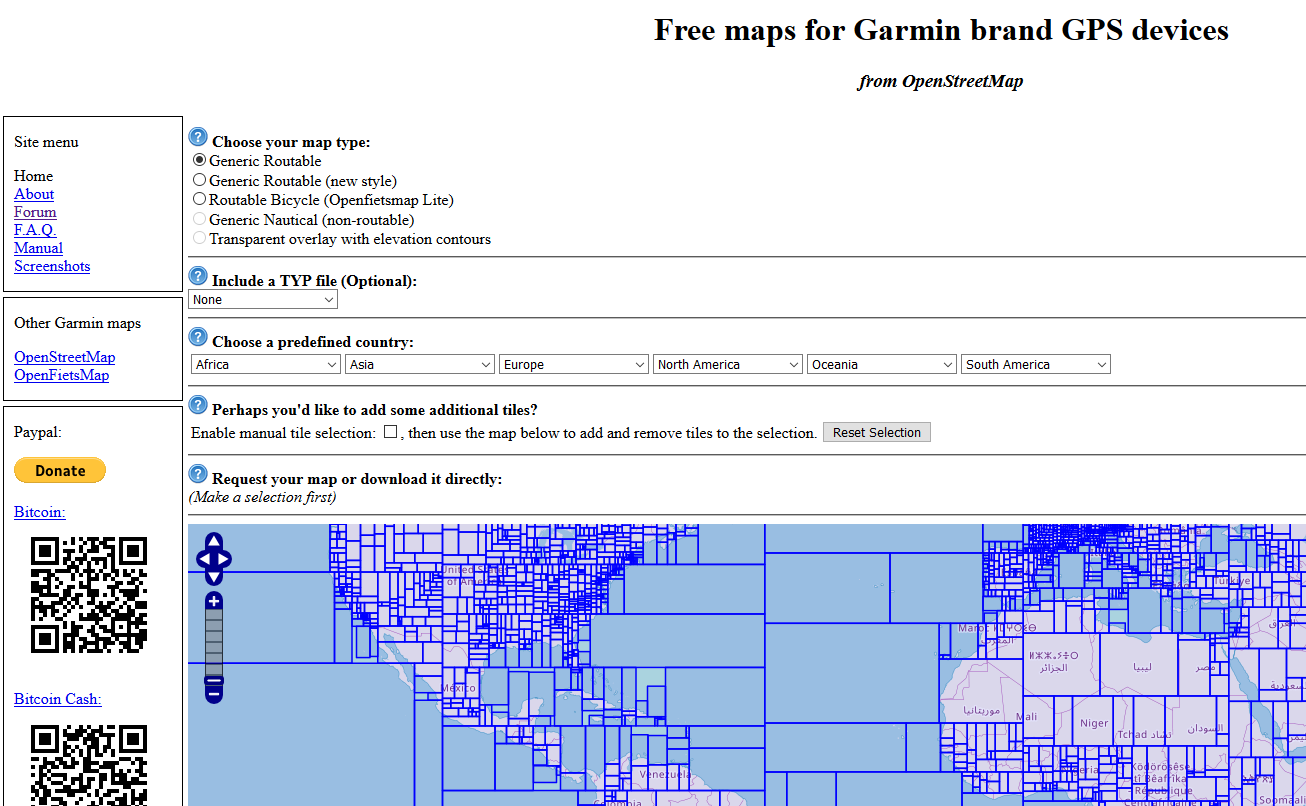
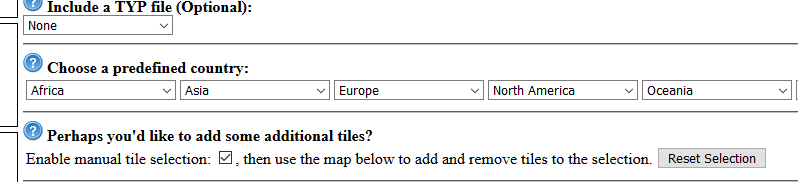
There is a website that hosts openstreetmaps content, and if you visit the site (http://garmin.openstreetmap.nl) you are given a user interface that allows you to select contiguous portions of maps, in order to create a larger map, which is customized to include only the portions of the world that you are traveling to. Generally, the website is awesome, offers free, detailed maps, but it does have some annoying little problems which are not documented anywhere that I’ve been able to find. The user interface of the program/website can be seen below.
As noted, this website has some limitations, as all websites do. In particular, the problem is that this website’s limitations are related to generating the maps, if you don’t understand the limiations prior to generating the maps, you’ll be unable to accomplish the objective stated in the problem statement above.
Maps, metadata, and attributes
Let’s say that you want to generate a map. The website is happy to generate the map for you, but if you’ve manually selected each individual tile, combining them into a single map, you’re pretty likely to run into issues that have to do with the fact that the maps are always named the same, and their metadata is also set identically.
You’re not allowed to change the Family ID, map name, map display name, or map filename. Without the ability to alter some of these parameters, all of the maps are created with the same filenames, and the same embedded metadata. This lack of flexibility is really only a problem when you try to install multiple maps to Basecamp or to the GPS.
When maps are generated for you using the Openstreetmaps website.
When you download a map from Openstreetmaps, you’ll find that you need to be able to install the map on your PC or Mac, so that it is available to Basecamp, and also deploy the map into/onto your GPS.
This article discusses and clarifies some of the limitations of the Openstreetmaps.nl solution, and proceeds to solve for each limitation in a clear, concise, thoughtful, and coherent manner. First of all, let’s look at the website http://garmin.openstreetmap.nl overall, then we’ll look at the limitations of the Garmin GPS maps, and the maps which are suitable to be used with Basecamp, Garmin’s mapping program.
The Openstreetmap user interface looks like the picture below.
Notice that, using the menu choices above, you can select a country, or you can manually select any number of squares within the world map, and combine them into a map which you can download
The picture below shows the various ways that you can select a country, or manually select tiles.
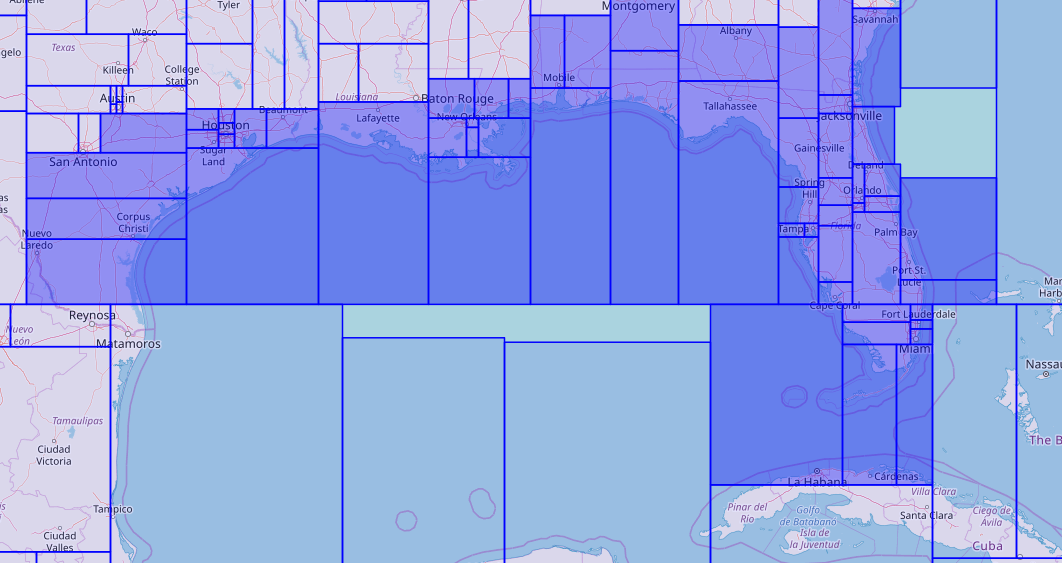
As an example, I’ve selected a number of map blocks which define the land area of Florida, and the portion of the land that is adjacent to the Gulf of Mexico, as if I would ride from FLA to Houston along the coast.
Look at the picture below, and notice all of the individual blocks selected.
The picture below shows the file data related to the selections you’ve made.
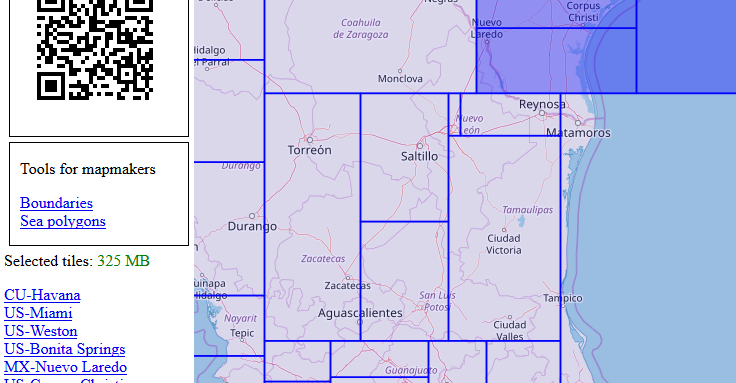
If you look on the left hand side of the page, and notice that the cumulative size of the tiles that I’ve selected is 325 MB. Wow, that’s 325 MB for just one State, and a little bit of the coast. Well, as it turns out, there is a limit to the size of a map that you can create.
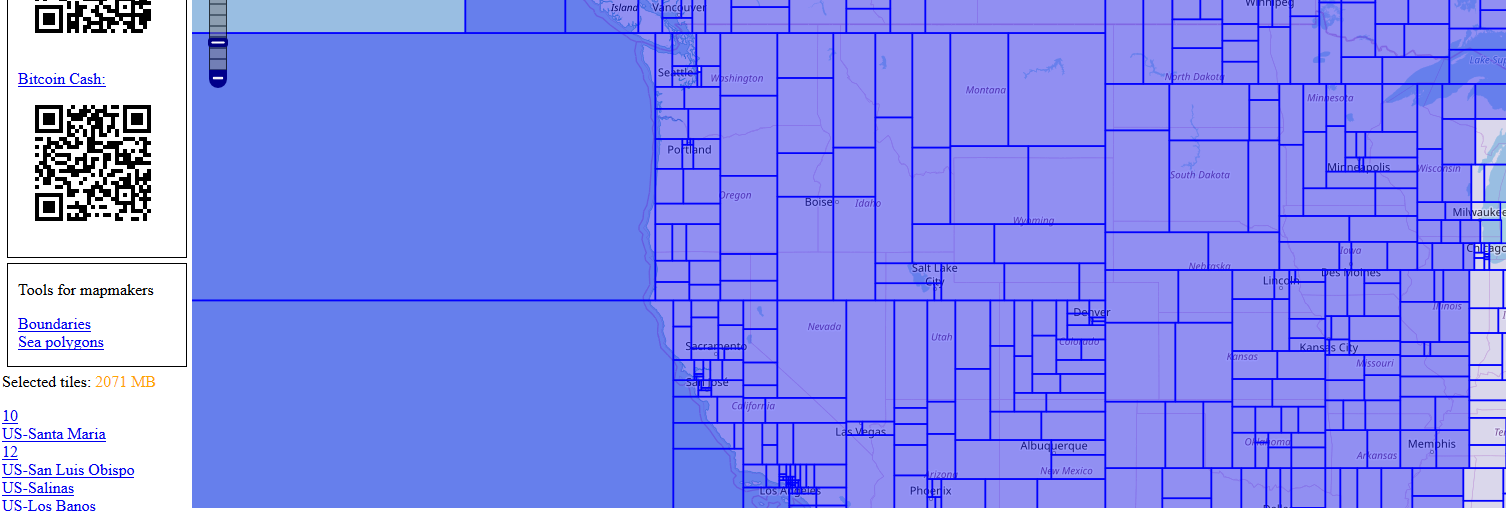
In the image above, notice that I’ve selected a much greater number of tiles, which causes the overall size of the map to be larger. In fact, the map is now 2071 KB, which is just shy of 2.1 GB. Notice that the color of the text that shows the file size for the selected tiles has gone from Green to Yellow/Orange. This is an indication that the number of tiles selected will not allow the application to create a windows-installable map. So, the net result would be that we can create a map for the GPS, but not a corresponding map that we could install in our Windows PC.
If you’ve manually selected tiles, and the filesize is indicated in green, then after the website generates your files, you’ll end up with a file listing that looks like the Image below.
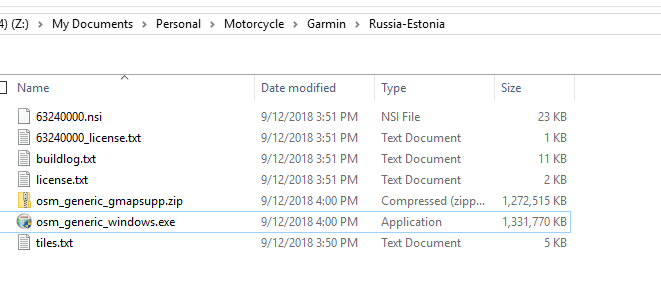
The File Listing
You’ll notice that there is a file named “osm_generic_windows.exe. This file is the “windows-installable” map. If I’ve picked the files manually from all of the available tiles on the website, then Openstreetmaps will always generate a windows-installable file, and a osm_generic_gmapsupp.img file with the same names. As it turns out, this will cause problems.
Now, let’s talk more about the “windows-installable” map.
As it turns out, Windows is very particular about how these maps get installed. Each and every time the OpenStreetMap website creates a windows-installable map, it give it the same filename, which is osm_generic_windows.exe . The file is an executable file, which installs the map into windows. Keep in mind, regardless of which tiles were selected for your map, the filename is always the same, but there are some other peculiarities which we also need to be mindful of.
This windows installer has some metadata embedded within, which is entered into the Windows Registry, and becomes tied to the “Programs and Features / Uninstall “ function in Control Panel. After installing a map, the Programs and Features list will show the Open Source Map as an installed program. After you rename the OSM map, so that you can install a second map, the Widows Registry will have a broken link, and you’ll no longer be able to properly remove or uninstall the program. At the end of this post, I’ll talk about how to fix this problem as well.
The affect of selecting a standard country map instead
When you manually select tiles, and then have openstreetmap generate the files for you, it sets the Family ID to 2000. This value is part of the metadata that I had mentioned previously, and which will cause a conflict.
Think of it this way… If you install a map, and the name of the map is always the same, even if the content of the map is different, and the Family ID of the map is the same, regardless of the content included in the map, then Windows will see these two maps as being identical, even though they are for two different geographic locations on Earth.
So, as it turns out, if you had asked Openstreetmap to generate a map, and you did so by selecting a country, then the map will be generated with a different file name, and the Family ID will be set to a unique value. As a result, you’ll likely be able to install multiple maps, without any problem. But this approach will cause you to need a separate map for every country, and when planning a route in Basecamp, it is often very important to know where the country boundaries (borders) are, so that you can create a route that flows from one country, into the next.
However, if you were to select all of your maps from discrete map/country selections, you would likely not see this problem. Admittedly, I have not tested this extensively, as I simply don’t have the time.
Installing multiple maps into Windows for Basecamp
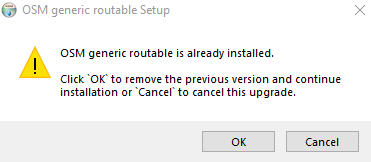
This is a problem that becomes apparent as soon as you try to install a second map into windows. Because the metadata is always the same, and the program shows up as OSM generic routable in the windows uninstaller, if you try to install another map, you’ll receive an error message, telling you that a map is already installed, and if you select OK, the new map will replace the old map. The error message will be as shown below.
The net result of this is that after you’ve installed two different maps, you’ll end up with only one map installed. The map that remains will the most recent map installed. So, there is in essence no way to get the Openstreetmaps website to generate a windows installable file, to overcome this problem. But, there is a tool that can be used to overcome the issues.
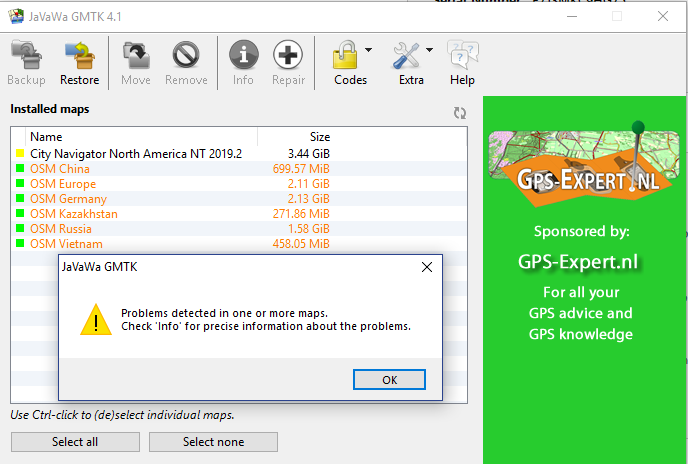
Using the JaVaWa toolkit to rename maps
The tool I’m referring to is called JaVaWa GMTK. This tool allows you to manually manipulate the ways that windows maps are installed, changing their names and appearances in Basecamp, and allowing you to install more than one map in Basecamp.
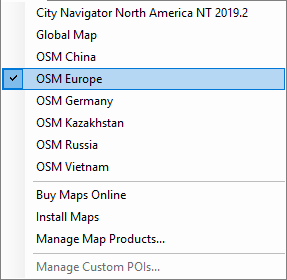
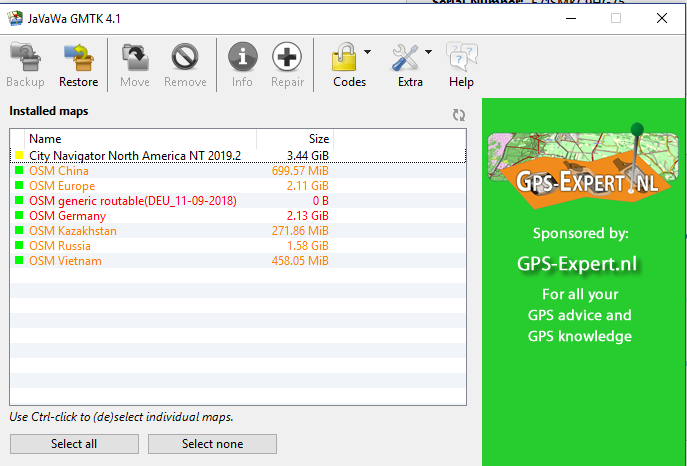 In the picture above, you’ll see that I’ve got 7 maps installed into my Windows PC. Notice that there are 8 entries in the list of maps. First of all, the City Navigator map is supplied by Garmin when you purchase the GPS. This map is installed with a different name, and a different family ID< so it does not pose any problems.
The picture shows the results of installing 6 maps. After each installation, I’ve used the GMTK tool to rename the maps, and to change the metadata so that it is easier to manage the maps, and all of the places in Basecamp where the maps show up, use “friendly names” which make more sense, and are easier to understand.
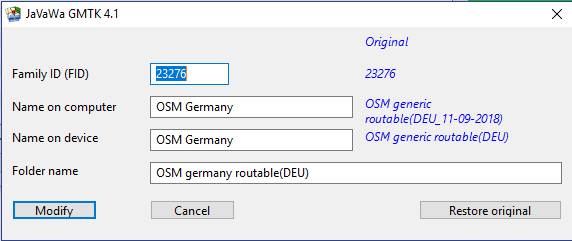
This drawings shows that after I renamed the German Country map, I see two representations of the map. The first is the OSF representation, which shows a size of zero, and the second is the renamed map of Germany, which shows a file size of 2.13 GB, and has a friendly name.
What this picture is showing is the conflict within windows, where the registry thinks that the old map still exists, even though it has been moved. So, it’s showing that it knows about the new map, but still has a reference to where that very same map used to be, before I renamed it, and moved it.
When this happens, you need to remove the OSM generic map from the list. Once again, the GMTK application can help with this.

In the gallery below, you’ll see several images, each of which shows how I’ve renamed the maps to an expression or name which is a more friendly name.


If you look closely at the gallery above, you’ll notice three important things.
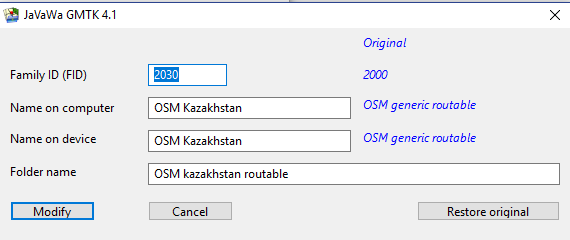
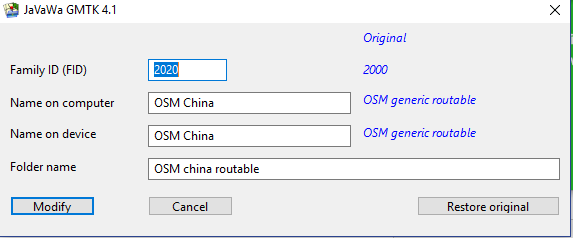
- For each map, the Family ID is unique. The German map has it’s own Unique ID, and all of the other maps were originally generated with a Family ID of 2000, and I have modified them to be 2010, 2020, 2030, 2040, and 2050.
- The field for [Name on the Computer], and [Name on the Device] no longer say osm_generic_routable. Instead, they have been modified to “friendly names”.
- The field for [Folder Name} has also been modified. This field now indicates the name of the folder, on the PC, where the maps are installed.
And so, to change the name and other attributes of a particular map, I simply started GMTK, selected a map, pressed the “Extras” button, and selected [Change map name and ID] from the menu. At this point, you’ll be able to modify the names and ID, to whatever you like.
Please note that the Family ID values are pretty much arbitrary. I’ve decided to keep the general 2000 numbering scheme, but was careful to change the IDs so that none of them remain with a value of 2000, preferring to set their values to 2010 – 2050, in increments of 10. I suspect you can put virtually any value in this field.
Once you’ve installed all of the maps, and restarted Basecamp, you should be able to select [Maps] from the menu, and the following menu will be shown.
 Hey, what about “Install maps” and “Manage Map Products”?
Hey gang, I’m really sorry about that, but those two options are of no use to you. Both of those options are related to how you might install and manage maps if those maps had been purchased the maps from Garmin. And since we did not purchase the maps from Garmin, these features won’t help at all.
That said, it seems to me that it would be really, really helpful if Garmin accepted that Openstreetmaps is now the preferred source of maps, and help us install them, using these menu options.
Map Grid Conflicts – What are they?
When I selected all of the map grids that I wished to have built into a map that represents part of my trip, I knew that I could not create a single map, which represented every country I cared about. So, I built a number of maps, each one adjacent to the map next to it.
When I selected the tiles for each map, I also selected one or two tiles outside of the region I wanted, so that as I rode from one country to the next, I did not have to change maps at the border. So, as it turns out, Basecamp is OK with this, but the GMTK software recognizes it as a conflict between the maps.
Looking at the image below, you’ll see that virtually all of my maps are now shown in Orange font, indicating that there is a conflict between them. This conflict causes no problems whatsoever, as near as I can tell, but it’s annoying that, after all this work, I’ve got this one error to deal with.
Wow, we’re done with Windows, now what?
Whew, we’ve finally finished installing the maps into Windows, and Basecamp recognizes them, and also displays them with all of the attributes that you’ve set. And so, it’s now time to deploy the maps into the GPS.
Deploying the maps into the GPS – Intro
Deploying the maps into the GPS has it’s own set of challenges. First of all, let’s lay out the problems, and then address them as we did previously in this post. The problems are as follows.
- Downloading the maps from openstreetmap will always generate a GPS map with the same filename. The filename is and will always be “gmapsupp.img”.
- Installing the maps on the GPS is a manual process, requiring that you place all of the maps into a specific folder.
- The metadata in the map considers the name of the map to always be “OSM Generic Routable Map”.
Identical filenames
When dealing with windows files, we considered changing the name of the windows-installable file, but that change would have had no affect at all for the way that the maps get installed. The issue is different when we attempt to deploy the maps into the GPS.
All of the .IMG files must all be placed into the “Garmin” directory in the GPS file system, and the must be uniquely named.
Installing the maps onto the GPS filesystem
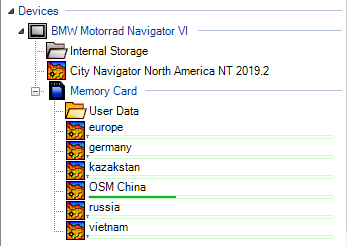
In my case, I’ve installed an SD card into the GPS, and copied a good amount of music into the SD card. Each artist has their own directory, and each album has a sub-directory underneath it. Finally, each song is an .MP3 file, within these sub-directories.
So, I created a directory named “Garmin” intermingled with the music files. Into this directory, I placed all of the .IMG files. I took each of these .IMG files and renamed them to a more descriptive name. For example, I renamed the file for Russia from gmapsupp.img to russia.img. I followed suit with the file for China, renaming the file from gmapsupp.img to china.img.
By doing this, I’m able to have 6 maps, each with a unique filename.
Modifying the metadata for the GPS maps
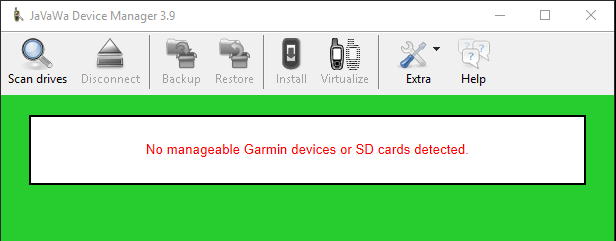
To modify the metadata in these files, you’ll need to use a tool called JaVaWa Device Manager, which is available on the Internet. This tool allows you to connect to a number of GPS devices, and to interact with the files on the device. The tool’s help file states all of the devices that it can connect to, and unfortunately the BMW Mottorrad Navigator VI is not one of them. And so, at first blush it looks like we will not be able to manipulate these files. But, here’s the thing… The tool only cares about the file, and the file system. So, even though the Device Manager does not find my Navigator VI, I’m still able to modify the files.
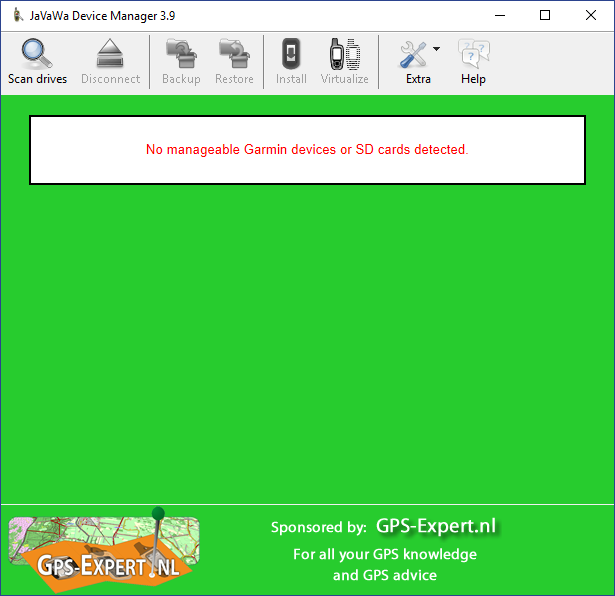 When I start the Device Manager app, I’m presented with a screen that shows that I’m not connected to, or attached to any GPS device. Of course, this is not correct. In fact, I’ve got the Navigator VI connected to the PC using a USB cable, and I’m able to interact with the device’s file system as I wish.
However, whatever method the Device Manager uses when trying to connect to the navigator VI is not capable of discovering it. You’ll see below what the initial screen looks like.
So, to solve the problem, I simply need to open my GPS, remove the SD card, and insert the SD card into my PC, so that it is recognizable. To do this, you can put the Micro SD card into a SD holder, which I can insert directly into the SD memory card slot on my PC. If your PC does not have a SD card slot, then you can still insert it by using a USB to SD or USB to Micro SD card holder.
And so, once you’ve inserted the card into your PC, it will generally register with the Operating System, and it will be assigned a drive letter. Once that has happened, you’ll need to initiate a scan in the Device Manager. Simply depress [Scan drives] in the menu of the Device Manager.
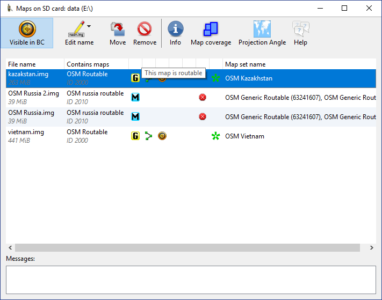
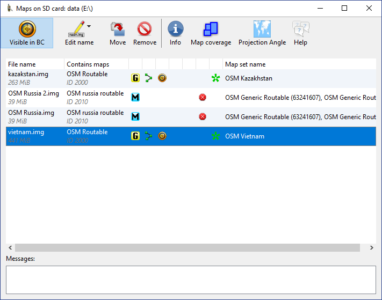
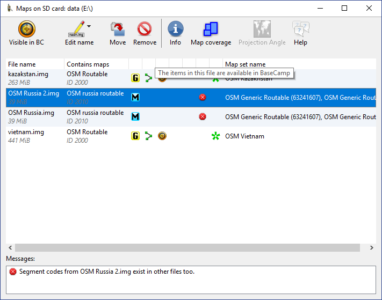
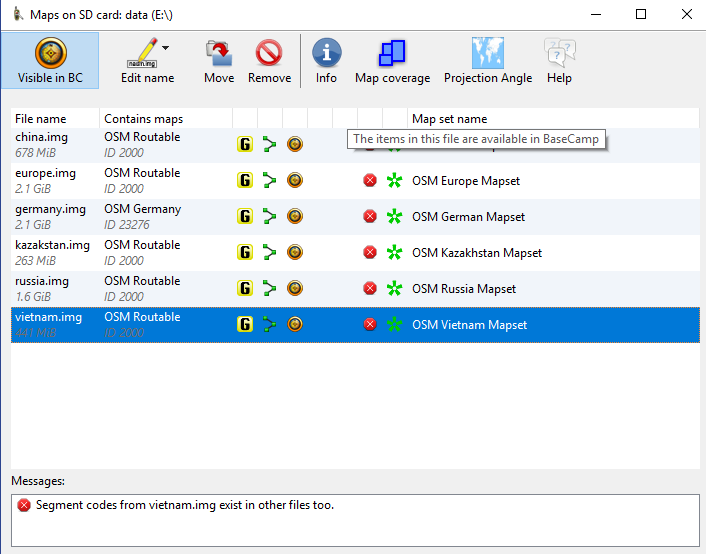
Sometimes, you’ll be asked to select which drive to scan, in other cases, the DM will auto-scan. In my case, because I’ve used this program before, it seemed to recognize my previous choice, and it found 4 maps.
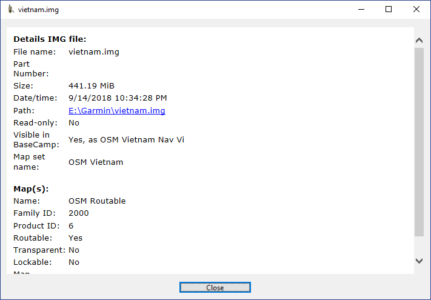
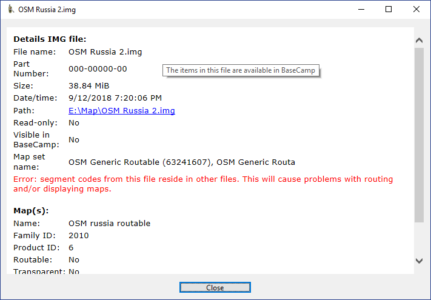
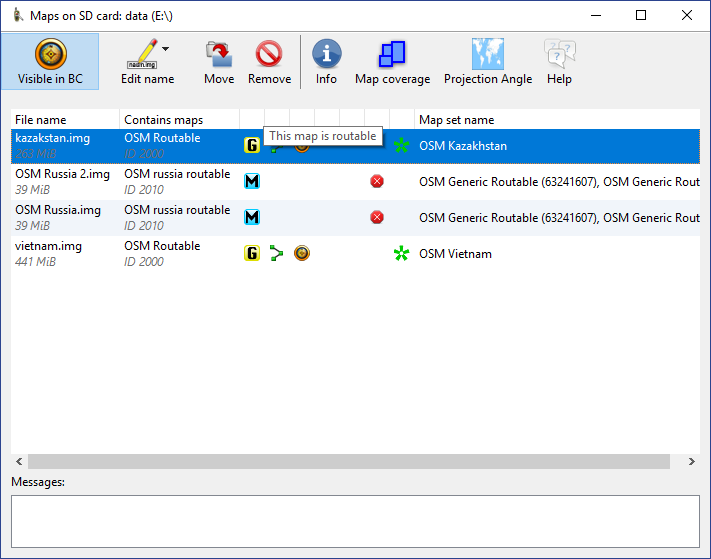
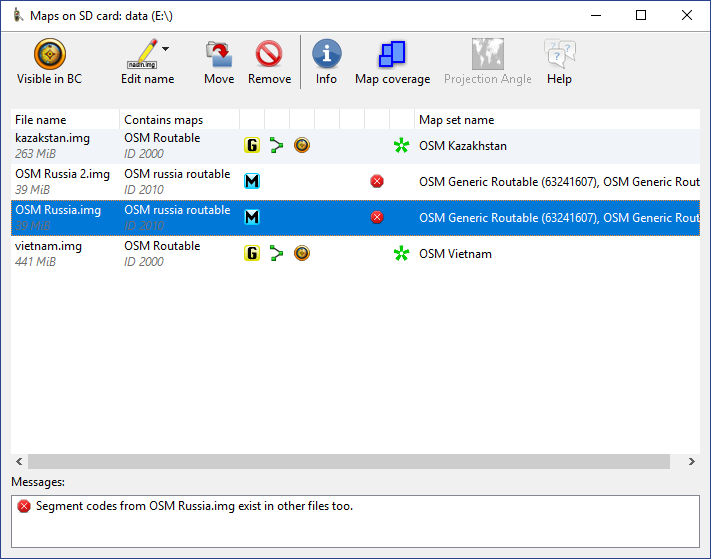 The picture above shows 4 map files. I have intentionally placed two of them in the correct location, while two others are not in the correct location.


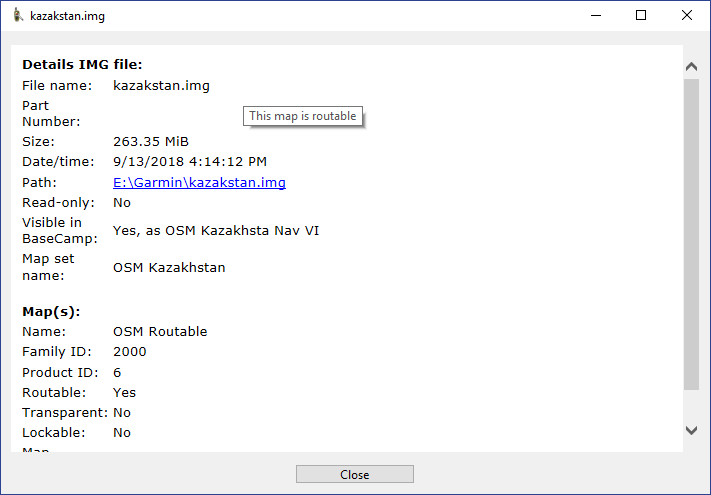
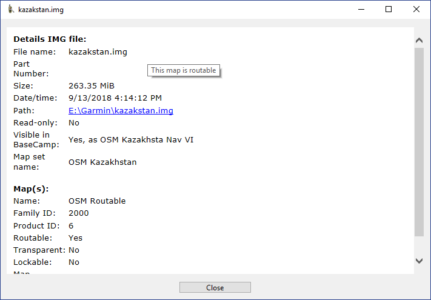
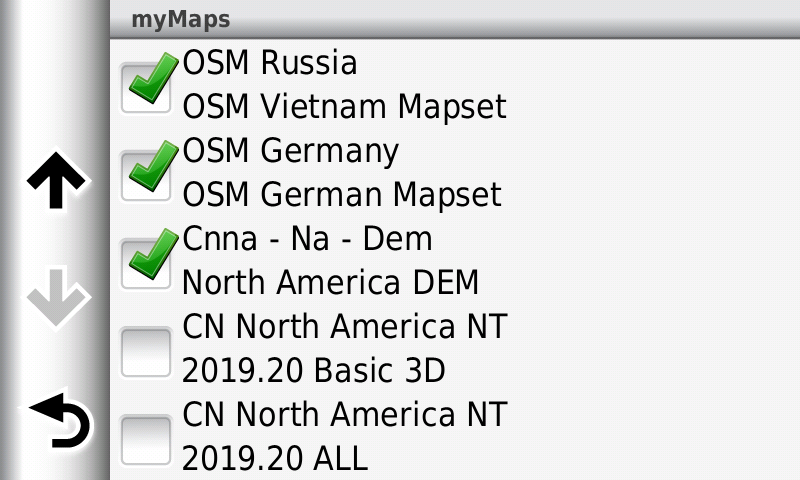
Looking at the rotating gallery above, you’ll see the files for Kazakhstan, Vietnam, and then Russia. For each map, you’ll see that I’ve selected that map, and the following slide will show the details of that map itself.
Pay careful attention to all of the Info. You’ll notice that the maps that appear with the Yellow/Black G are legitimally deployed into the Garmin directory, while the other two maps show a Blue/Black M. I’m not sure what it means, but the maps will not work when deployed here.
Also, take note of the icon that represents Basecamp. This means that when you connect your GPS to your computer, and start Basecamp, these maps will be visible to Basecamp. And finally, the Green flower is some sort of an indication that all’s well.
Looking at the image above, you can now see and understand that two of these maps are installed correctly while two are not. Let’s look at another example of maps being deployed on my GPS, and how I went about naming them.
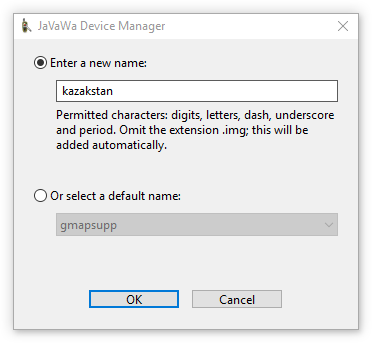
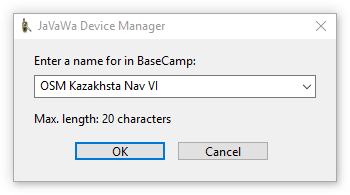
There are 4 different metadata attributes that are related to how the map is named, and which you can set using the Device Manager. In this example, we’ll look at the map of Kazakhstan in more detail.
Before we change the names, let’s take a look of how they will appear on the GPS. To see the details shown below, start your Nav VI, enter Settings, enter Maps and Products, scroll down and select My Maps.


I’ve had different maps installed in my GPS at different points in time. So, the three pictures above show a number of variations that I went through, as I tried to figure out exactly how changing each of the 4 different name attributes affects how the files appear in the GPS.
Using the Device Manager to change the names
With a single map selected, when you should select [Edit Name] to select which of the 4 attributes you’ll change.

After pressing the [Edit Name] button, you’ll be presented with the choice to edit
- Edit File Name
- Edit Map Name
- Edit Mapset Name
- Edit Name in Basecamp.
The 4 choices present you with the ability to edit these attributes, as shown below.
What do the GPS maps look like in Basecamp?
The first time you start Basecamp, with your GPS connected, after you’ve renamed all of the maps, you’ll see something like what I’m displaying below. This image shows the process that the GPS goes through, when it finds new maps.
Apparently, the GPS will identify the maps, and then attempt to read them into memory, assuming that all of them are selected and set to active, within the GPS itself. The picture below shows that the GPS is reading the China Map, and it still has 5 others to go.
Are we done?
Ok, so now you’re able to rename the maps that are deployed into your GPS, and you’re done. We’ve addressed each problem, spoken about how and why the problem appears, and what to do about it.
To be honest, this post is likely to become outdated in short order, but it still seems to me that someone needed to write it.
I wish you all the best. You’ve now learned how to address a set of very much undocumented features of Open Street Maps.
Cliff, You keep referring to “Basecamp”.
Is this the Garmin main program, or some other program you downloaded to the PC. Being a TomTom user I’m not familiar with Garmin terms.
Hey Lee,
Basecamp is mapping s/w that is provided to anyone that owns a Garmin GPS. In fact, you could likely use it with any other brand of GPS, but it is provided by, and supported by Garmin. Most folks who own a GPS simply use the screen of the GPS itself to search for destinations, manage their common points of interest, and so on. But, motorcyclists are different. We tend to be very particular, and we tend to want to use roads and routes which rely on dirt and unimproved roads, and we search out windy roads, rather than smooth straight highways. And so most Motorcyclists use some form of s/w to plan their routes. In my case, because of all of the complexity of my route, I’m using Basecamp to give me the big and the small picture of what will amount to 100 days on the road.